Siding is one part of a water-management assembly. A replacement scope should explain how incidental water behind the cladding reaches a safe exit and how openings, roofs, decks and penetrations connect to that path. New boards can improve appearance while leaving a failed transition untouched. Investigate the pathway, then price the correction.
Read the wall as a connected system
The visible cladding sheds much of the weather. Behind it, the water-resistive layer and flashing must be integrated at the building’s interruptions. A good detail moves water toward the exterior instead of trapping it at a seam or feeding it behind the next layer. The design must suit the actual wall and products.
An owner does not need to design those details, but can ask where each one appears in the scope. Use the following conceptual sequence to organize the conversation:
Weather reaches cladding → incidental water reaches the drainage plane → flashings manage interruptions → water exits outward.
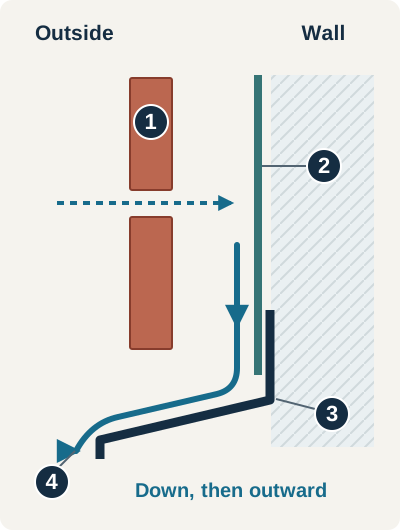
- Cladding: The outer surface sheds weather; the dashed arrow represents incidental water at a joint.
- Drainage plane: The water-control layer behind the cladding directs that water down its exterior face.
- Flashing transition: The drainage plane overlaps the flashing so the water path continues outward.
- Outward exit: The solid arrow follows water away from the wall. Actual exit details are system-specific.
This is a planning diagram, not an installation section. It does not specify fasteners, membrane laps, fire design, insulation or clearances. Those require the applicable product documents and project-specific design.
Start with roof-to-wall intersections
Where a lower roof meets a taller wall, water from the roof concentrates at the intersection. Ask how existing step and kick-out flashing will be evaluated, accessed and integrated with the replacement wall layers. The contractor should identify whether roofing work is included or needs coordination with another trade.
The Building America Solution Center treats roof-wall flashing as its own retrofit topic. That separation is useful for a board reviewing a bid: replacing the siding field does not describe what happens at the roof edge.
Window and door transitions need their own scope
Ask whether windows stay in place, whether trim is removed and how the new water-control layer connects to existing opening details. A “siding only” proposal may not include exposing the connection needed to investigate a recurring leak. Clarify that before comparing it to a more complete proposal.
Record which side of the opening shows symptoms and whether interior reports correlate with weather. A stain below a window does not prove the window is the source; water may enter above or beside it. The investigator should explain what evidence supports the diagnosis and what remains unverified.
Penetrations are a quantity, not an afterthought
Count lights, vents, hose bibs, cables and other penetrations. Identify who disconnects and reinstalls fixtures, whether blocks or flashings change and which trades must participate. Ask how the detail maintains both the water path and the intended function of the equipment.
A scope that prices square footage alone can omit many of these repeated tasks. For a building with dozens of openings and fixtures, count-based details may be a meaningful part of the work even when the cladding area is modest.
Why some gaps are deliberately left open
Not every visible gap should be filled with sealant. Certain siding details require drainage space, clearance or movement. Sealing an intended exit can change how the assembly handles water. Other joints do require the specified sealant and preparation. The distinction comes from the selected system’s instructions, not from a general rule to caulk everything.
James Hardie’s installation best-practice page illustrates separate roof, deck, penetration and horizontal-flashing conditions, including locations identified as “do not caulk.” Use the current complete instructions for the actual product and application before accepting a detail. A website illustration is not a substitute for the project specification.
Adding insulation changes more than the finish thickness
Exterior insulation can change the wall’s temperature profile, drying behavior and attachment arrangement. Existing interior vapor-control layers, new exterior materials and indoor moisture conditions need to be considered together. Do not assume adding an impermeable exterior layer is harmless simply because it improves a nominal insulation value.
The Building America condensation-control guide explains why cold-climate assemblies need a deliberate balance of condensation control and drying. Its residential examples are explanatory references, not an adopted multifamily design for this property. Have the project’s qualified designer establish the appropriate assembly and any energy-code implications.
Ask how added thickness changes window returns, trim, flashing projections and attachment into the structure. Put those coordinated details into the bid; pricing insulation as a stand-alone sheet material can miss the work needed around it.
A useful concealed-work photo record
| Photo or record | What it helps establish |
|---|---|
| Overall opened elevation | Where the work belongs in the building record |
| Condition before repair | What was observed, with scale and location |
| Approved backing or framing repair | What work was authorized and completed |
| Opening and roof transitions before cladding | How the specified detail was carried through |
| Product labels and approved substitutions | Which materials actually went into the assembly |
| Completed elevation | The visible result and any remaining punch-list items |
Photos support review; they do not certify hidden work or replace required inspections. Agree on observation points before the wall is closed, including who reviews a discovered condition and who releases the next stage.
Define who specifies and accepts investigation or testing
If water testing, moisture measurements or selective openings are proposed, ask who designs the investigation, what question it answers and what its limitations are. Record the locations, method, conditions and criteria used by the qualified investigator. A reading or a hose test without that context can be easy to misinterpret.
Separate the investigation assignment from construction observation and final acceptance. The same professional may perform more than one role, but the engagement should say so. Request a clear statement of what the evidence supports, which areas remain unverified and what finding would trigger further investigation.
When to involve a building-envelope professional
Repeated unexplained leakage, deterioration across multiple systems, uncertain existing assemblies or potential structural involvement may require a qualified specialist beyond a surface repair quote. Define the professional’s assignment: investigation, repair design, bid assistance, observation or some combination. Do not assume one report includes all of them.
Use the repair service planning page for a focused defect, or the property-manager project page for repeated issues across buildings. The complete replacement guide connects this technical scope to budgeting, approvals and occupied-site work.